Vyapin has released a new version (4.0.1) of its Vyapin Microsoft 365 Management Suite product recently. This new version has a few bug fixes and improvements compared to the previous version of the application. We have illustrated the bug fixes and enhancements in this new version, as below:
- Fixed an issue in running, editing and deleting the schedule tasks, whose task name contains period/dot (.) in it. This update is applicable for all modules in the product.
- Following improvements in the PST export feature in the Office 365 Export module:
- Performance enhancement.
- Added an Export Statistics window, to show the number of folders, items that are exported from each of the processed folders.
- Inclusion of ‘Activity Log Viewer’ option.
- In the Microsoft 365 Manager module, we have modified the “Mailbox Folder Permissions” feature to introduce separate folder permission management for each folder in a mailbox.
Bug fix for scheduled task with period/dot (.) in its name:
The application provides means to export or email its reports by using Windows Scheduled tasks, which are stored as files in file system. In the previous versions of Vyapin Microsoft 365 Management Suite, if a user creates a schedule task with a period/dot (.) in its name (e.g., My.PST.export task), then the task will fail to run at the scheduled time. Additionally, the user will face the following issues:
- Unable to delete that task.
- ‘Open Export location’ not functioning.
- Empty values for ‘Task Details’ and ‘Task History’.
- When editing the PST export task, it will open some other feature instead of PST window.
Now, we have tuned the application to run the schedule tasks even if the task contains period/dot (.) in it. Henceforth, the above-mentioned issues (a, b, c and d) also will not occur.
Improvements in the PST export feature:
We have added a few significant enhancements to the most sought-after feature (Export Message Folders and Online Archive to PST), in this new version of the product, as described below.
Performance enhancement:
The previous version of Vyapin Microsoft 365 Management Suite application used a single thread approach to export the message folders as PST. This has led the application to perform the export in a sequential manner leading to long running export process.
Since most of our customers are using PST export feature in our application extensively, we have refined the export process by leveraging the multi-threaded approach. This will definitely give the users improved performance throughput in PST export, especially in the case of bulk export.
New Export Statistics window showing the number of folders, items that get exported:
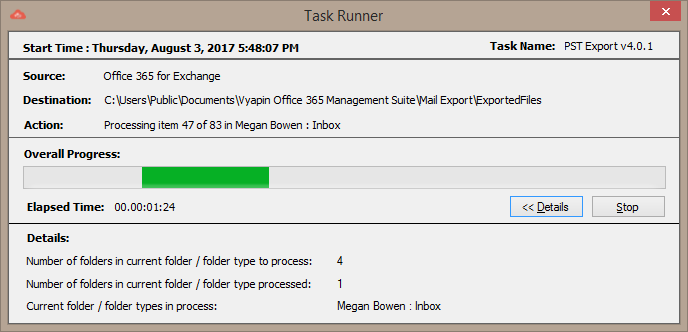
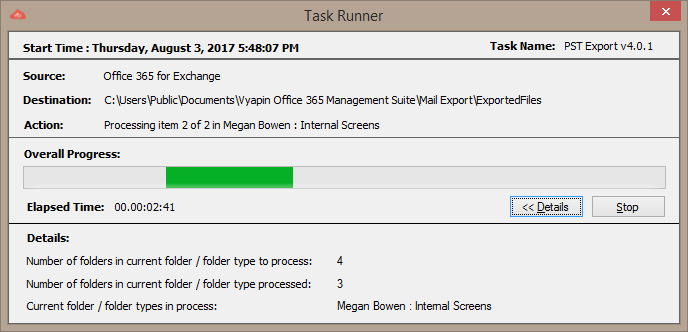
For the PST Export task that is currently running, we have included a new status dialog with information about progress of the task. The details include ‘Number of folders to process’, ‘Number of folders processed’ and ‘Current folder in process’ along with the count and name of the mailbox and its folders in the ‘Task Runner’ dialog (as shown in the below snapshots).
This will enable users to know the current status of the export process and based on the details provided in the task runner, he/she can calculate the approximate time for the task to complete. This is more useful especially in the context of long running export, where the user would be clueless about what is getting exported and how long will it to take to complete. Meanwhile, they can work on something else.
Inclusion of ‘Activity Log Viewer’ option for PST export feature:
We have included a separate ‘Activity Log Viewer’ option to have a track for the end user about the number of folders, items and attachments exported along with the processed folders and items failed to process.
The end user can launch the ‘Activity Log Viewer’ dialog by performing the following steps:
- Create a new PST export task by navigating (Office 365 Export –> New Task –> Mailbox Export –> select ‘Export Message Folders and Online Archive to PST’ in the Export option).
- Select the mailbox and run the export task.
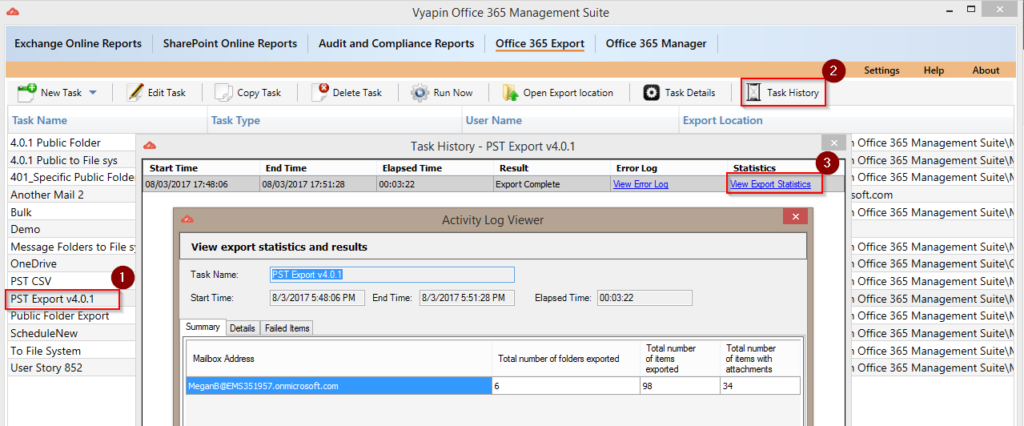
- Once the export task is complete, select the newly created task (e.g., PST Export v4.0.1) as shown in the below screenshot (numbered as 1) and select ‘Task History’ icon as shown in (numbered as 2).
- In the ‘Task History’ window, click ‘View Export Statistics’ hyperlink as shown in the screenshot (numbered as 3) which is available under ‘Statistics’ column.
- It will open up the ‘Activity Log Viewer’ dialog.
- The ‘Summary’ tab will provide you the exported information about the total number of folders, items and items with attachments.
- The ‘Details’ tab will give you the ‘Mailbox address’, ‘Folder name’, ‘Folder Path’, ‘Number of items in folder’ and ‘Number of items exported’ details.
- The ‘Failed Items’ tab will have details about the items which failed to export (if any).
Microsoft 365 Manager module – Enhanced “Mailbox Folder Permissions” feature by introducing separate folder permission management provision for each folder in a mailbox.
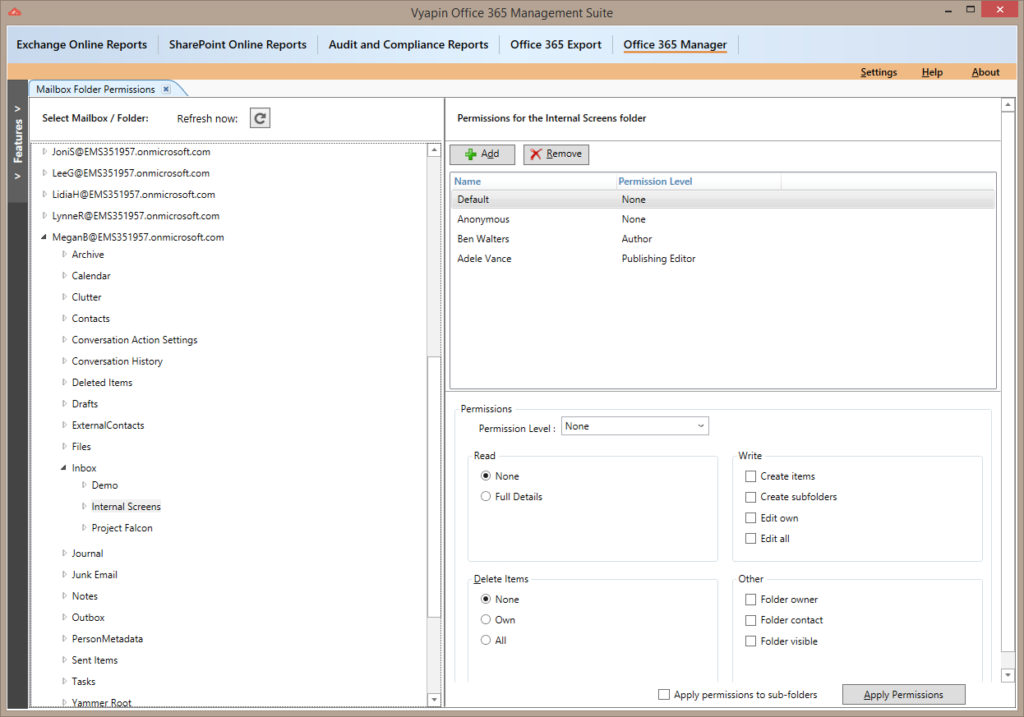
For another frequently used report in the application, namely, ‘Mailbox Folder Permissions’, we have received much customer feedback. Based on this, we have made certain major UI changes so that the feature is more flexible but still remains ease of use for our customers. This new report window will present the report details and the provision to manage the permissions in a single screen, unlike the multiple clicks when using Outlook. Here is how the new ‘Mailbox Folder Permissions’ report looks like:
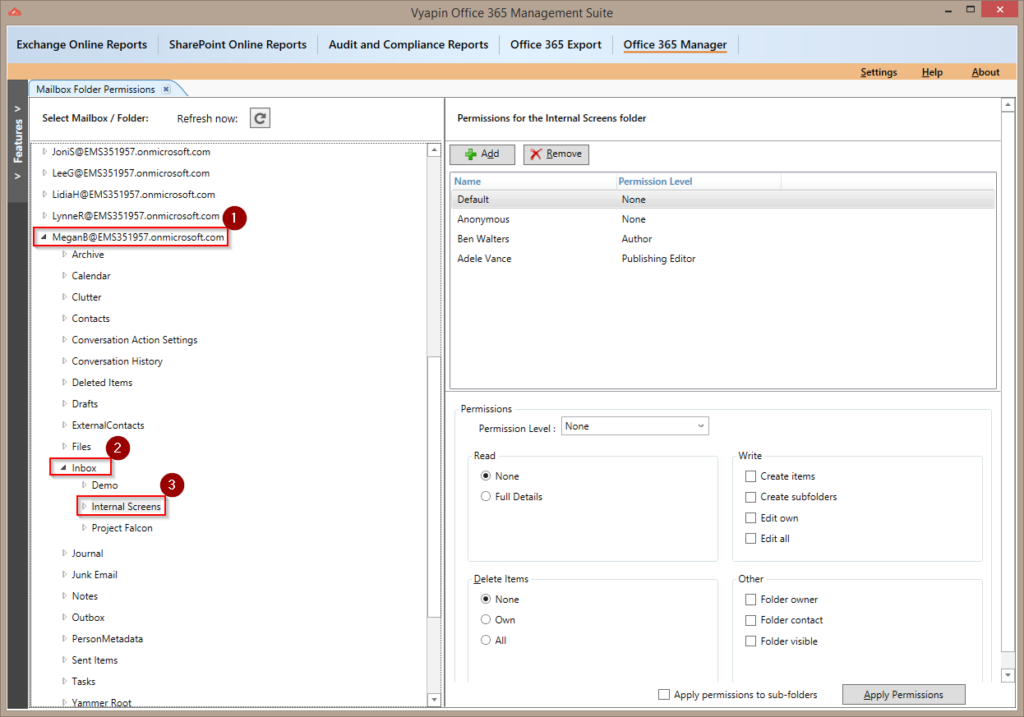
Skeleton of the ‘Mailbox Folder Permissions’ report (shown above):
In the left pane of the report window, all the mailboxes of the configured tenant in the ‘Configuration Settings’ dialog will be displayed. Here, user can enumerate the mailboxes, their folders and up to ‘n’ level of sub folders.
In the top right pane of the report, you can add the new user accounts using ![]() button and remove the user accounts using the
button and remove the user accounts using the ![]() button.
button.
In the bottom right pane, you can set the permission level for the user accounts from the available default levels in the drop down list.
How to use the ‘Mailbox Folder Permissions’ report:
Once the ‘Mailbox Folder Permissions’ report is launched, select the required mailbox (e.g., Meganb@EMS351957.onmicrosoft.com) or its folder for which the user account and permissions have to be modified.
From the above screen, you can see that the “Meganb@EMS351957.onmicrosoft.com” mailbox content is enumerated and the ‘Internal Screens’ sub folder present under the ‘Inbox’ folder is selected. In the right pane, you can see the currently available users who are assigned permissions and the permission levels for the ‘Internal Screens’ folder.
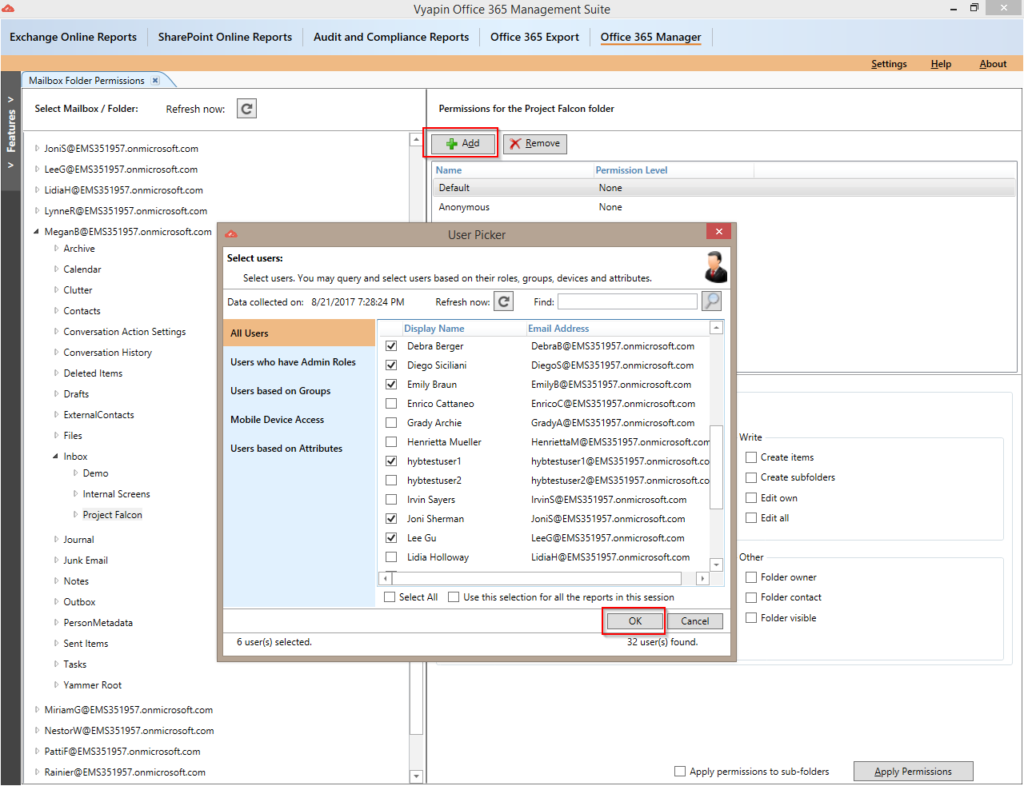
Once the required mailbox / folder is selected, you can add the new user accounts by clicking ![]() button. This will open the ‘User Picker’ dialog and based on the requirement, you can add ‘n’ number of user accounts from the list of available users displayed in the dialog (as shown below).
button. This will open the ‘User Picker’ dialog and based on the requirement, you can add ‘n’ number of user accounts from the list of available users displayed in the dialog (as shown below).
Once the user accounts are selected, click OK button and the selected users will be displayed in the Mailbox Folder Permissions report window.
NOTE: The user accounts will not be added/remove unless the end user clicks the ‘Apply Permissions’ button.
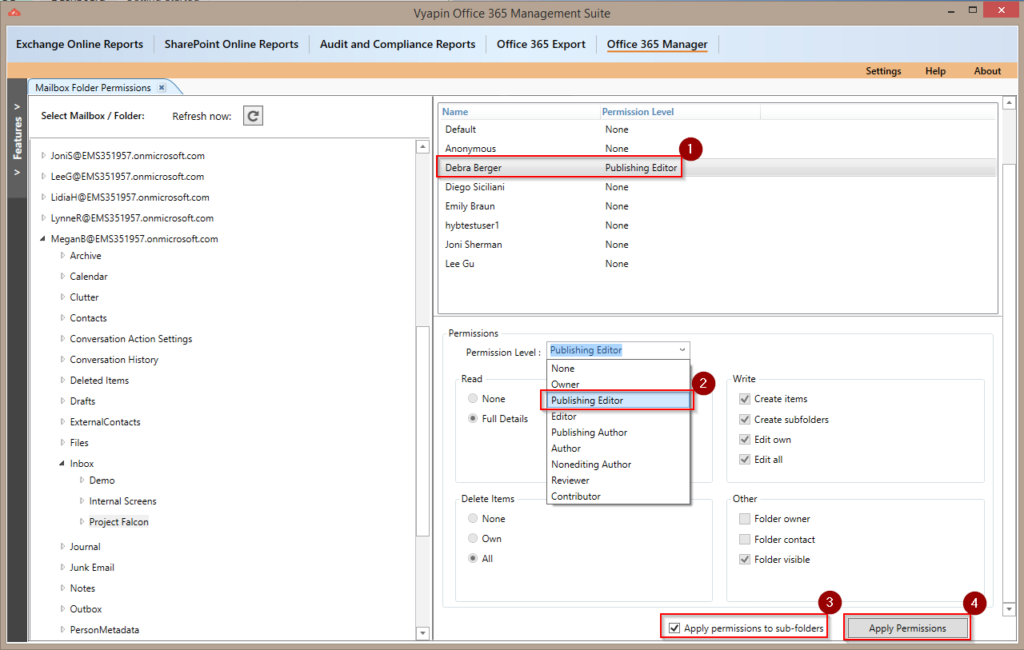
By default, the permission levels of the added user accounts will be in ‘None’ state. To change the permission levels, select a specific user account and select anyone of the permissions levels from the drop down list. User can also set the custom levels of his / her own choice of permission level from the list of available attributes.
Additionally, one can use the “Apply permissions to sub-folders” option, if the user is willing to add the same set of users and the corresponding permission levels of the root folder to the sub folders available underneath.
Once both the user accounts and permission levels are set, click ‘Apply Permissions’ button available in the bottom right corner of the report window to execute the changes (as shown in the above snapshot).
With all these updates, we believe that this new version of Vyapin Microsoft 365 Management Suite v4.0.1 will be a most beneficial update for our customers.

