Vyapin’s DocKIT Migrator is a powerful migration tool that offers extensive features to migrate contents from file shares along with metadata, permissions to either on-premise SharePoint or SharePoint Online in Office 365.
The newly released version of DocKIT v7.0 supports SharePoint Online configured with different authentication mechanisms. With this version, you can migrate contents to SharePoint Online sites using cloud and federated identities.
I will discuss the salient steps to create a DocKIT task to migrate documents from file shares to Office 365 in this blog article.
- Click ‘New Task’ button in the DocKIT main screen.

Select a suitable task type in New Task dialog and click OK.
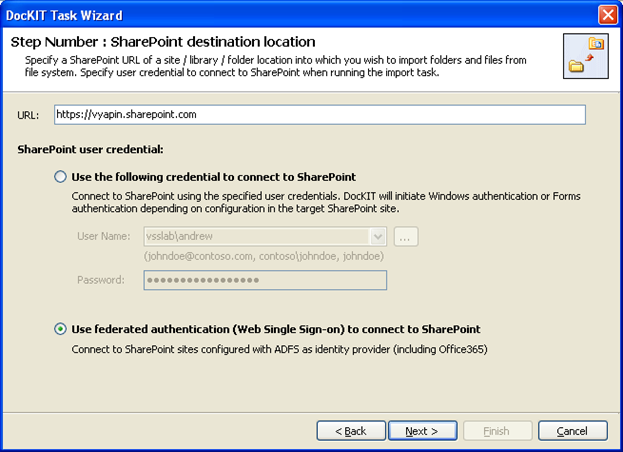
- Specify a valid SharePoint Office 365 site URL (including sites configured using ADFS). If you are using cloud identity to connect to SharePoint site, select ‘Use the following credential to connect to SharePoint’ option under SharePoint user credentials. Then specify the username and password in the respective text boxes. Select ‘Use federated authentication (Web Single Sign-on)’ option under SharePoint user credentials to connect to on-premise / Office 365’s SharePoint site configured with ADFS federated authentication (Web Single Sign-on).
Figure #2: SharePoint destination location
- Once you select the above mentioned option and click ‘Next’, the web login dialog will appear as shown below:
Figure #3: SharePoint Online login
- Provide ‘User ID’ and ‘Password’ in the respective text boxes. Then click ‘Sign in’.
- Click Add / Edit… button, select the files / folders to import and click ‘Next’ button (as shown in Figure #4).
Figure #4: Items to Import
- In the ‘Metadata Options’ wizard step, specify the metadata file to use for the import task and specify the ‘Allow Fill-in settings’ (only for Choice and Managed Metadata fields), if required.
Figure #5: Metadata Options
- Provide the various DocKIT templates created using DocKIT Template Manager as input (as shown in Figure #6).
Figure #6: Mapping Templates
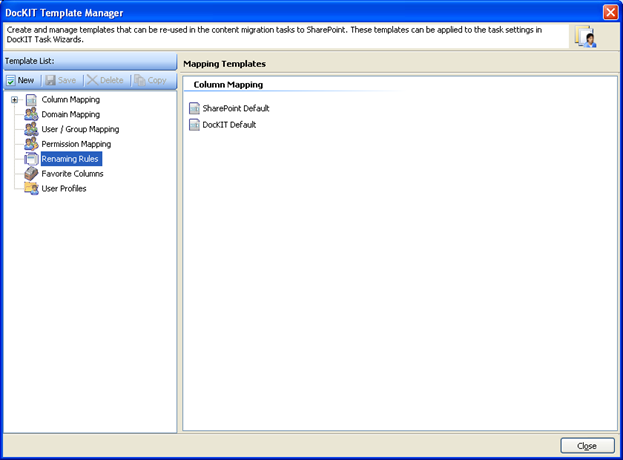
- Additionally, if you intend to propagate fields such as ‘Created Date’, ‘Modified Date’, ‘Created By’ and ‘Modified By’ for folders / files from file shares to SharePoint, you have to create a Column Mapping Template. Click Manage Templates… button and DocKIT Template Manager dialog will appear as shown below in Figure #7.
Figure #7: Mapping Templates
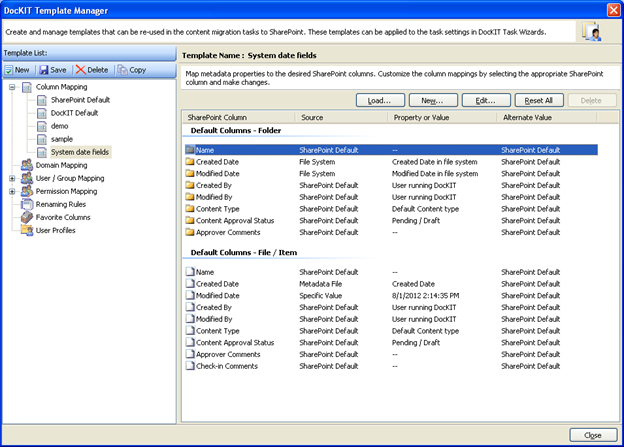
- Click ‘New’ in the toolbar, provide the unique template name and specify the template group as ‘Column Mapping’ in the ‘New Template’ dialog.
- Once you click ‘Save’ button, a newly created template will be added to the template list under ‘Column Mapping’ node.
Figure #8: Template for mapping date fields
- As for assigning ‘Created Date’, ‘Modified Date’, ‘Created By’ and ‘Modified By’ values for the files / folders, edit respective columns under one by one under ‘Default Columns – Folder’ and ‘Default Columns – File / Item’ and provide the required source option and values.
- Save the template and specify the created template as an input to DocKIT as shown below.
Figure #9: Mapped templates
- Proceed with the subsequent wizard steps as required.
- Enter a unique task name in the appropriate text box and select the appropriate option under ‘Connect to SharePoint As’ section to connect to SharePoint.
Figure #10: Task Schedule Settings
- For Office 365 (ADFS configured) and claims enabled federated authentication sites: Select ‘Use federated authentication (Web SSO) for the SharePoint site’ option.
Figure #11: Task settings for federated authentication
- For Run later or
Run now options, the Web Single Sign-on framework expects the username and password to be given by the user interactively in a browser based login dialog as shown below:Figure #12: Task settings for federated authentication
Provide username and password in the respective text boxes and click ‘Sign in’ button to proceed.
For Schedule option, DocKIT enables you to setup the migration task using cookie-based persistent connection and shared user credentials technique. DocKIT expects the user performing the migration to ensure that a persistent connection is available using the Web Single Sign-on Dashboard tool (Tools -> Web SSO Dashboard menu) that is built into the application. When creating a scheduled migration task, you can use the Web Single Sign-on Dashboard to check the connection status. You can also connect to a SharePoint site manually before the task executes automatically at the prescribed date/time.
To check the connection status in DocKIT Task Wizard, Click to check session status hyperlink in the screen. The Web Single Sign-on Dashboard screen will appear as shown in Figure #11.
Figure #13: Web Single Sign-on Dashboard
Finally, click Finish button in the DocKIT Task Wizard to create the migration task.
Thus, DocKIT provides a comprehensive SharePoint migration solution for moving files from network shares to SharePoint Online in Office 365. Visit https://www.vyapinsoftware.com/products/sharepoint-migration/dockit/sharepoint-migration-tools for more information.


