How to use this new content migration feature?
Prerequisites
- The Quick Migrator Agent should run in the SharePoint servers (Source & Target) during the entire duration of the migration task run.
- A common temporary storage location is required for XPlica application to share this workspace with the source and target server Quick Migrator Agents.
Quick Migration task options
- Site Collections – Migrate site collections across SharePoint web applications.
- Webs – Migrate site or sub-web across site collections / sites.
- Lists/Libraries – Migrate lists / libraries across sites.
- Folders – Migrate folders across libraries / folders.
Basic requirements
- Ample space in destination content database and disk space in the temporary storage location
- Empty site collection in the target server for site collection migration
- The target server should contain the required SharePoint language packs
- Ensure that quick migration tasks are not running in parallel
- Ensure all feature definitions activated in the source server are available in the target server.
- Ensure the same port configuration in XPlica client, Quick Migrator Agent and the windows firewall for the respective servers.
- Ensure the currently logged on user running XPlica client and the user accounts specified for migration has write access permissions to the temporary storage
location.
Quick Migration task options
- Site Collections – Migrate site collections across SharePoint web applications.
- Webs – Migrate site or sub-web across site collections / sites.
- Lists/Libraries – Migrate lists / libraries across sites.
- Folders – Migrate folders across libraries / folders.
Basic requirements
- Ample space in destination content database and disk space in the temporary storage location
- Empty site collection in the target server for site collection migration
- The target server should contain the required SharePoint language packs
- Ensure that quick migration tasks are not running in parallel
- Ensure all feature definitions activated in the source server are available in the target server.
- Ensure the same port configuration in XPlica client, Quick Migrator Agent and the windows firewall for the respective servers.
- Ensure the currently logged on user running XPlica client and the user accounts specified for migration has write access permissions to the temporary storage location.
Here is a sample walkthrough illustrating some of the major steps involved in the quick migration process:
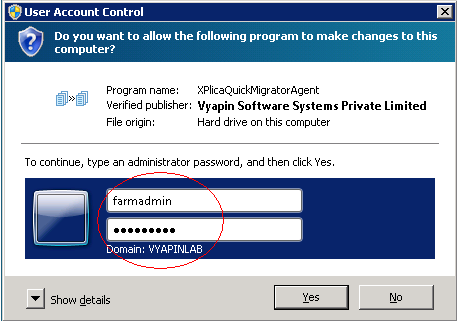
Figure #1: Quick Migration Agent
Connect to run the Quick Migration Agent in the server
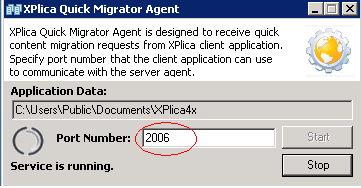
Figure #2: Specifying port details
Specify the port number for the client to communicate with the server.
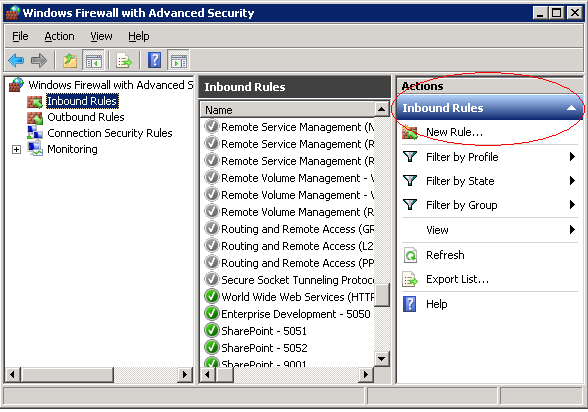
Figure #3: Windows firewall security settings – Choosing rules
Create a new rule under the ‘Inbound Rules’ category
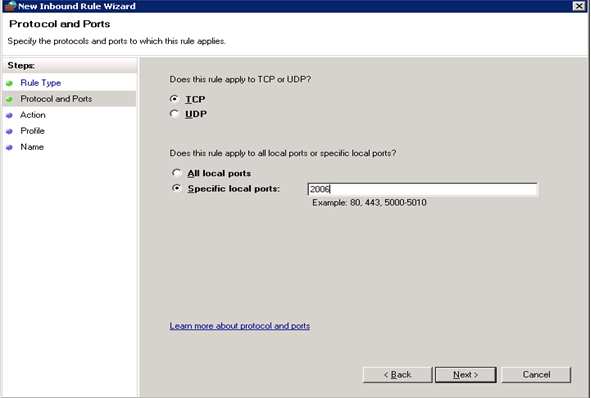
Figure #4: Windows firewall security settings – Defining Rule type, Protocol / Ports, Action, Profile & Name
The Firewall Rule type ‘Port’ has been selected and applied to ‘TCP protocol’ and ‘Specific local ports’. Options to either ‘Allow the connection’ or ‘Allow a secured connection’ or ‘Block a connection’ can be chosen for a connection matching the conditional rule with the ‘Action’ option. The default option is ‘Allow connection’.
This newly created rule applies to profiles – Domain, Private & Public. Also, a name is defined as ’Sample Rule for XPlica’ with a description.
Task Options – Explained
A Quick Migration task can be created in XPlica to migrate entire site collection, site, list/library and folders. The Quick Migration task sub-options are categorized as below:
Migrating Site Collections, List/Library & Folder
This option allows you to migrate entire site collection with all its sub-sites, lists, list items and their associated metadata, permissions.
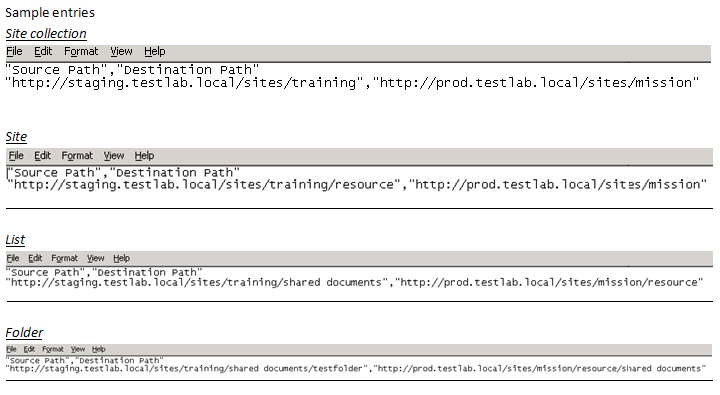
Source: A site collection (e.g., http://staging.testlab.local/sites/training)
Target: An empty site collection (e.g., http://prod.testlab.local/sites/mission)
Pre-requisite: Empty site collection has to be created in target SharePoint, before migration.
Note:
- You do not have to create SharePoint infrastructure like sites/webs, lists, libraries, folders, columns, content types, templates, etc.
- Contents available (if any) in target SharePoint will always be overwritten.
Migrating Site or Sub-Web
This option allows you to migrate a site with all its sub-sites, lists, list items and their associated metadata, permissions to another site collection / site.
Source: A site/web (e.g. ,http://staging.testlab.local/sites/training/resource)
Target: A site collection (e.g., http://prod.testlab.local/sites/mission)
Behavior: Specified site will be created as a sub-site under target SharePoint site collection / site, after migration.
Note: Contents available (if any) in target SharePoint will always be overwritten.
Migrating List / Library
This option allows you to migrate a list / library with all its contents and their associated metadata across SharePoint sites.
Source: A list/library (e.g., http://staging.testlab.local/sites/training/shared documents)
Target: A site/web (e.g., http://prod.testlab.local/sites/mission/resource)
Behavior: Specified list/library will be created in target SharePoint, after migration.
Note:
- You do not have to create list/library and its columns in target SharePoint, before migration. Provides options for duplicate files (the files that already exists in target SharePoint).
- Permission associated with library and its contents will not be migrated. No provision to ignore sub-folders.
Migrating Folder
This option allows you to migrate a folder in list/library with all its contents and their associated metadata.
Source: A folder (e.g., http://staging.testlab.local/sites/training/shared documents/testfolder)
Target: A list/library (e.g., http://prod.testlab.local/sites/mission/resource/shared documents)
Behavior: Specified folder will be created as top-level folder in target SharePoint, after migration.
Note:
- You do not have to create list/library and its columns in target SharePoint, before migration.
- Cannot migrate a folder to another folder in target SharePoint. Permission associated with the folder and its contents will NOT be migrated. No provision to ignore sub-folders.
Creating a new Quick migration task
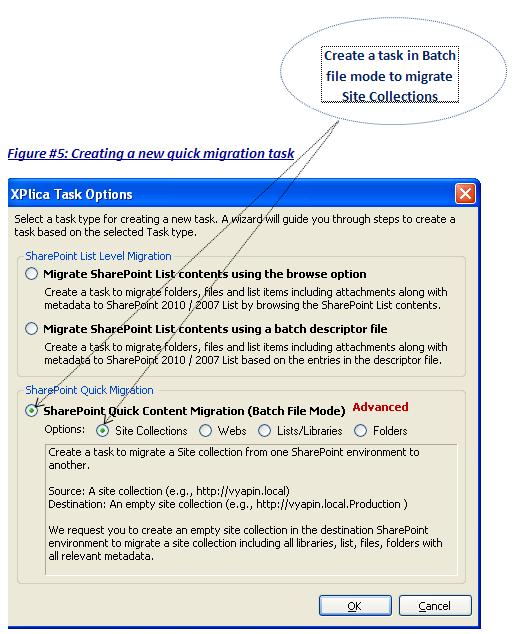
Launch XPlica Task Options dialog to select the desired task option for migrating the site collection, sites, lists, and folders, as given below:
Source & Target Server User credentials
Connect to the Source & Target SharePoint site with the user credentials that has sufficient permissions to create sites/lists and manage permissions in target.
Ensure the user account also has write access to the temporary storage location used by the migration task to temporarily export the contents and import from them into target SharePoint.
Batch Descriptor file
Prepare a batch descriptor file (CSV/TXT/XLS/XLSX formats) that has the relevant details about source and target server site collection, lists, folders, as per your migration needs.
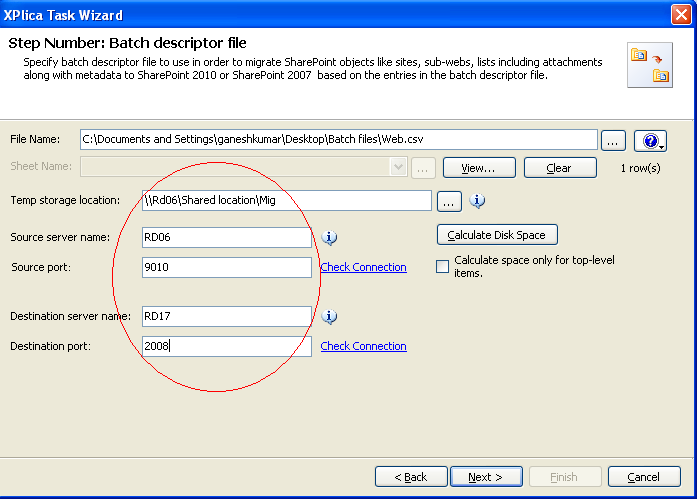
Temporary storage location and Quick Migrator Agent info
Provide a suitable folder available as network share for exporting contents from source before migrating them to target server.
Enter the name of source and target SharePoint servers and port number under which the Quick Migrator Agent is running.
Click ‘Calculate Disk Space’ to verify the available disk space in the temporary location for successful migration.
The above mentioned information is depicted in the following image:
Figure #6: Batch descriptor file
General settings
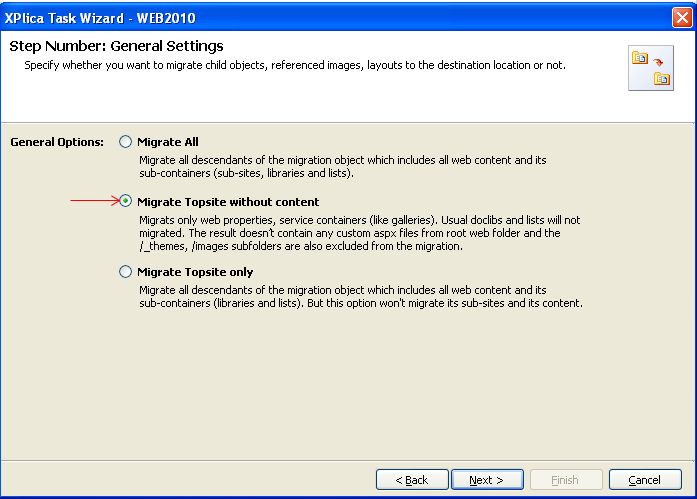
While migrating entire site collection / site, you can migrate all contents or top level site structure alone with or without the contents. Likewise, all child objects, referenced images, layouts etc. can be migrated to the target server as required.
In case of list migration, you can migrate entire list with their views, columns and it settings, but optionally with or without the contents.
The available options associated with site collection/site and list task sub-options are as follows:
- Migrate all – All child objects including the web contents and its sub containers such as sub-sites, libraries & lists).
- Migrate Top Site without content – Migrates only web properties, service containers such as galleries.
- Migrate Top Site only – Migrates the child objects excluding sub-sites and its content.
- Migrate all items – Migrates all objects including the contents, views, columns.
- Migrate list without items – Migrates all objects like views, columns excluding the contents.
Note: The last two options are applicable only for list migration.
Figure #7: Migrating child objects with or without content
Version options
You can migrate select or entire version history by using the desired options, as mentioned below:
- All versions – to migrate all versions of a list item present in source
- Current version – to migrate the latest (current) version of a list item present in source
- Last major version only – to migrate the last major version of a list item available in source
- Last major and minor versions – to migrate the last major and its immediate minor versions of a list item present in source
Library content settings (Handling duplicate file / documents)
The duplicate list item or file can be effectively handled by either ‘Not overwriting’ or ‘Overwriting’ or just ‘Appending’ as new version to the file using library content
settings.
Date and user information settings
In this step, you can instruct XPlica to retain the original created date and modified date and user information as in source during migration (OR) retain only the original date. In other cases, it assigns the current system date & user account to the migrated content.
Web parts
During site collection / site migration, the web parts can either be included (migrates all web parts in the source site collection or site) or excluded (does not migrate all web parts in the source site collection or site) by choosing the relevant option.
Note: The web part assemblies need to be installed in the target SharePoint server in order for migrated web parts to work properly.
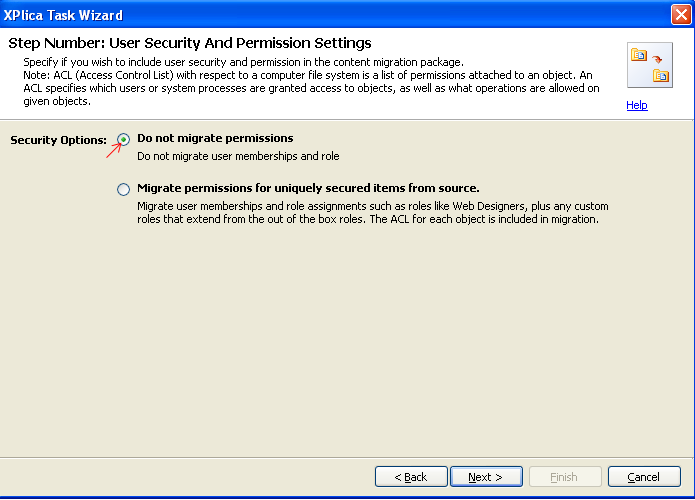
User Security and permission settings
You can migrate user membership & permission in terms of role assignments by using this step.
Figure #8: Permissions migration
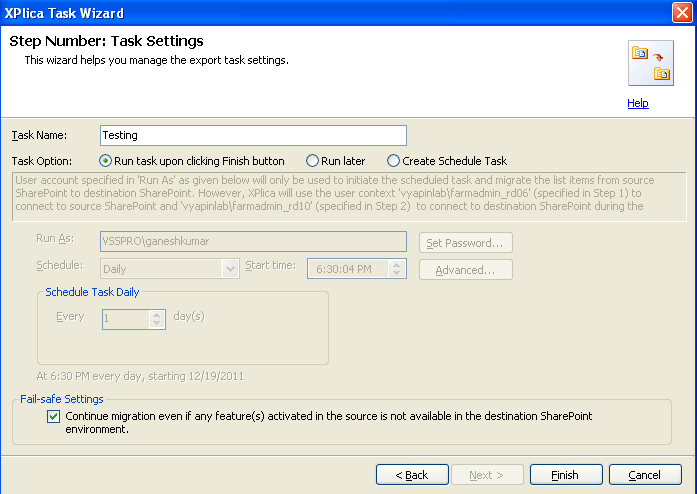
Task settings
The migration task can be scheduled to run at a regular time intervals (Daily, Weekly, Monthly and at time) by ‘Creating a Schedule Task’ or can be saved to ‘Run later’ or ‘Run immediately’ by clicking theFinish’ button.
Figure #9: Scheduling migration task
Activity log
This log gives information on the task status such as errors if any, the task settings, the migration results etc.
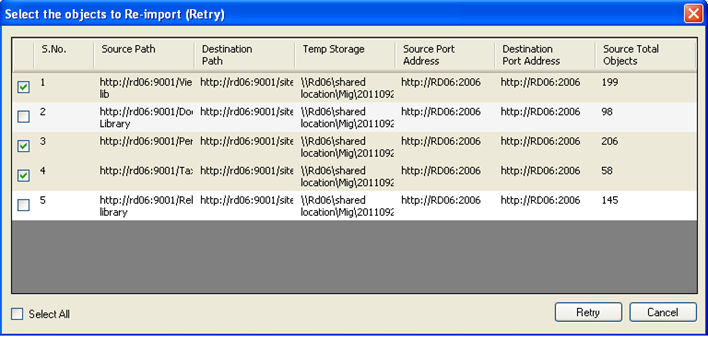
Figure #10: Re-import task
In case of any migration error, the migration task can be repeated using this Re-import wizard.
Select those erroneous documents and re-import with the ‘Retry’ button.
Cleansing Temporary storage
The files created by the application during migration in the temporary storage can be removed once the migration task is complete.
For more information about XPlica for SharePoint 2010, go to: https://www.vyapinsoftware.com/products/sharepoint-migration/dockit/sharepoint-migration-tools

